
Tie-dye is a fun and easy craft project that anyone can do! The rainbow swirls of color are actually simple to achieve and kids and adults love to tie-dye to get those fun summer camp vibes. You can customize your look to use a rainbow of hues (or just your favorite colors) and there are several easy techniques that give you different cool tie-dye looks to choose from.
Just follow this step-by-step beginner’s guide to get your own tie-dye creation at home!
Love tie dye? Then you may also want to try: Shibori Tie-Dye, Resist Dye Basics, and How to Double Dip Dye (similar to ombre).

Tie-Dye Basics
The history of tie-dye dates back thousands of years, with evidence of similar techniques found in various cultures around the world.
However, the modern form of tie-dye that is most commonly associated with colorful patterns and designs on clothing emerged in the 1960s during the counterculture movement in the United States.
The basic idea is you cover areas of fabric by tying them off with rubber bands. Then, you dye the rest of the fabric, possibly in multiple colors. The tied-off areas do not get color, since they are not exposed to the dye color.
Tie-dye, like many projects, is about experimenting and enjoying the process while also at times being surprised by the results. If you want a perfectly curated look, tie-dye is likely not the best option, as it’s meant to look messy, colorful, and fun!
Looking for more nostalgic crafts? Check out How to Make Friendship Bracelets!

Tie-Dye Supplies
- Dye: There are so many dye colors you can choose from and you can mix and match to make your own custom colors. To make it easy, buy a tie-dye kit like this Tulip kit that has your dye all ready to go in prefilled bottles. Just add water and shake!
- Rubber bands: You can either use rubber bands you have around the house or buy a kit that has them included.
- Gloves & drop cloth: These items protect your hands and working surface from the dye so make sure to use them. You can use dish gloves or plastic gloves and any sort of waterproof or plastic sheet will do. A tie-dye kit will include these as well.
- Garments or items to dye: White cotton is best for tie-dye application although you can also dye other natural fabrics like rayon, silk, linen, or hemp.
- Drip pan (optional): A plastic sheet is helpful for protecting your work surface, but it’s also very handy to also use a drip pan under the item being dyed (something like a dish pan or plant saucer will do).
TIP: Aside from shirts, you can tie-dye so many different garments like sweatshirts, t-shirts, socks, bandanas, overalls, and more!
Do I have to use a pre-made dye kit for my tie-dye colors?
While the all-in-one kits like these Tulip dye kits are super helpful to get everything you need in one place, you can also mix your own colors for your tie-dye creation from dye concentrate added to water in your own squirt bottles.
Start with one tablespoon of liquid dye added to one cup warm water in a bottle and shake. Test on a scrap piece of clothing to see if you want to add more dye for brighter color or more water for a more subtle color.

Tie-Dye Garment Preparation
Begin by washing the garments you plan to dye. If they are things you already own and have washed before, you can skip this step. But anything new should be washed to remove any residue from the making of the garment.

Tie-Dye Tip: For the best color adhesion, soak your items in soda ash mixed into water for 20 minutes before tie-dying. While this step is optional, it will help make the colors on your tie-dye creation the brightest they can be.

How to Tie-Dye


Prep your workspace: Put down your protective cloth over your work surface and get your dye bottles ready with your chosen colors (these kits simply add water to the bottles and shake).
Dampen shirt: A slightly wet shirt will spread out the dye better than a totally dry shirt, so fully wet your item and then wring it out fully so it’s just damp.


Band and Dye shirt: Fold or swirl your shirt based on the design you want (check out our pattern options below!), add your rubber bands to keep in place, and add your dye.
Flip the shirt over and repeat on the other side trying to keep the same colors in similar spots.
REMEMBER! The more that several colors overlap, the bigger chance you have of getting muddied or brown colors in your tie-dye creation!
Try to keep colors that don’t make a pretty color together further apart but have fun bleeding colors that sit next to each other on the color chart.
(So two colors that sit next to each other on the rainbow, like blue and purple, will be pretty if they bleed together, but two colors that don’t, like green and orange, will make a brown).


Seal for 24 hours: While you can unveil your creation after about 6 hours, the best colors will come if you place it in a ziplock bag (to keep the dye from drying out) and leave it there for 24 hours.


Rinse and wash shirt: Remove your shirt from the bag, take off the bands, and rinse in a sink or tub with cold water until the water runs clear (you’ll want gloves for this step as well). Wash in cold water with a small amount of detergent in the washing machine, and add an extra rinse cycle if that’s an option on your washer (wash apart from other laundry for the first wash). Dry and wear proudly!

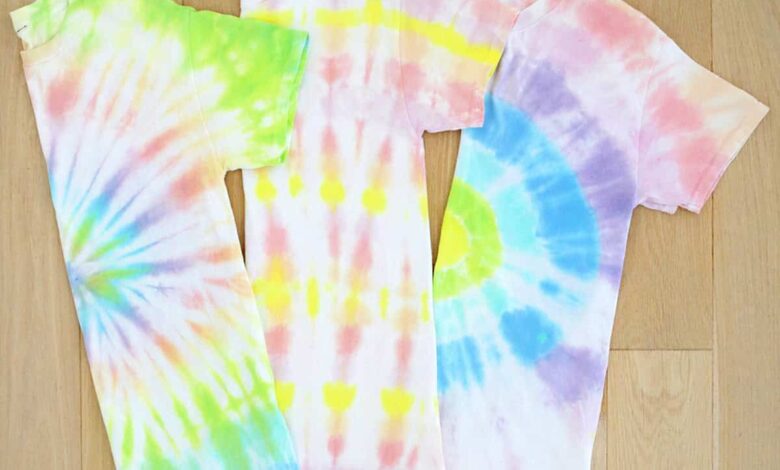
Tie-Dye Patterns
While there are so many options when it comes to tie-dye patterns, here are 4 classic methods to achieve different cool tie-dye looks for your personal creation.


Spiral Tie-Dye
This classic tie-dye shape is beautiful and easy to achieve!
Twist: Start with your shirt flat on the work surface. Pinch a small section in the center of your garment or stick a wooden dowel or cooking utensil end into the middle of the shirt. Twist the fabric around this point and keep twisting until the whole garment becomes a round disc. It should look like a cinnamon roll!
Secure: Secure the shirt with at least four or five rubber bands, crisscrossing them over the center of the disc. The tighter you bind the shirt, the more white there will be.
Dye and finish! When you dye, add color to different wedge sections on the disc (you can also do a different color in each section created by the rubber bands). Repeat the color on back, add to your plastic bag, wait, rinse and wash to unveil your creation!


Bullseye Tie-Dye
The Bullseye pattern is a great option for beginners.
Pinch: Pinch a section of fabric in the middle of the garment. Pull the fabric up the whole way off the floor, creating a fabric cone.
Secure: Wrap rubber bands around the cone of fabric, adding a band at each spot where you want to change colors. You can add as many or as few rubber bands as you want.
Dye and finish! When you go to dye, add a different color to each section between the rubber bands. Repeat the color on back, add to your plastic bag, wait, rinse and wash to unveil your creation!


Stripes Tie-Dye
The Stripe pattern is a fun and easy way to get a cool graphic look.
Fold: Lay the garment flat. Starting from the left or bottom side, fold the shirt in a series of small accordion-style folds. If you start folding from the left side you’ll create vertical lines, and if you start from the bottom you’ll create horizontal lines.
Secure: Zig zag the accordion folded shirt into a “Z” shape with the folds facing up. Wrap the folded shirt with rubber bands to secure.
Dye and finish! When you go to dye, add color to each section (between rubber bands). Repeat the color on back, add to your plastic bag, wait, rinse and wash to unveil your creation!


Scrunch Tie-Dye
This Scrunch tie-dye pattern gives you an organic marbled look that is another classically cool tie-dye look.
Scrunch: Lay your garment flat. Pinch a series of small sections and pull them up a bit to create small mountain shapes.
Secure: Continue until the whole shirt is scrunched into mini mountains and secure the whole shirt with overlapping rubber bands.
Dye and finish! When you go to dye, add color to different areas and try your best to replicate the color placement on the back of the banded shirt as well. Add dyed shirt to your plastic bag, wait, rinse and wash to unveil your creation!

Frequently Asked Questions
Should fabric be wet when you tie-dye?
It doesn’t have to be, but the dye will spread and take more easily if slightly damp (it’s also a better method to achieve more pastel colors). Dry fabric will usually result in an overall brighter color and you may also end up with more pure white areas since they dye doesn’t spread as far.
How long should tie-dye soak before rinsing?
For classic tie-dye, 4-6 hours is a good minimum, but you can allow the dye to set for closer to 24 hours for more intense colors.
What is the best fabric to tie-dye?
White or light colored 100% cotton is the most popular choice for beginner tie-dye application although you can also dye other natural fabrics like rayon, silk, linen, or hemp.
Polyester and cotton blend shirts won’t hold the color nearly as well, so find an option that doesn’t include polyester.
More Craft Projects
Love this post? Sign up for our newsletter for more ideas!

Get creative ideas for recipes, crafts, decor, and more in your inbox!

Get the How-To
Step by step instructions for the best supplies and classic tie dye patterns for beginners.
Instructions
-
Begin by washing the garments you plan to dye if they’ve never been washed.*
-
Mix your dyes according to the package instructions.
-
Cover your area with a drop cloth to protect it from any dye spills and wear disposable gloves as you work to protect your hands.
-
Scrunch up or fold your item as desired for your pattern and then add rubber bands to secure.
-
Add dye to the prepared fabric in your chosen color pattern until the top is saturated. Turn over and repeat on the other side.
-
Add your dyed fabric to a sealed off plastic bag (or twist a plastic grocery bag closed) and let it sit for 6-24 hours. The longer the better for color saturation.
-
Remove from bag and rinse your garment in the bathtub or kitchen sink until the water runs clear (wear gloves again for this step).
-
Wash the tie-dye item (or items) in the washing machine on cold separately from other laundry and dry or as you normally would.
Notes
- If the garments you are dyeing are things you already own and have washed before, you can skip washing them.
- A plastic sheet is helpful for protecting your work surface, but it’s also very handy to also use a drip pan under the item being dyed (something like a dish pan or plant saucer will do).
- You can also add an extra rinse cycle to your washer when washing the clothes for the first time if you machine has that setting to make sure any extra dye is rinsed out.
*Optional but you can soak in soda ash if you want for 20 minutes for better color adhesion.
Source link